
In my previous posted I briefly outlined my current attempts at a home automation setup using FHEM. In this post I will describe the basic steps necessary to set up FHEM on a Raspberry Pi - or rather what I did to set it up. There may be simpler ways.
FHEM basic installation
I wanted the latest and greatest FHEM version, so I pulled the latest sources from Sourceforge:
cd /home/pi
svn co https://svn.code.sf.net/p/fhem/code/trunk/fhem
Once you obtained the sources, the easiest is building a Debian package for installation and installing it afterwards.
cd /home/pi/fhem
sudo make deb
Mind the sudo before the make deb. The makefile apparently wants to chown some files and folders to root:root - and only root can do that.
Afterwards we can use dpkg to install the new package. This will likely fail with some errors because of missing dependencies. We are going to fix that with apt-get.
sudo dpkg -i fhem-5.7.deb
sudo apt-get -f install
That covers the basics. You will normally have a basic FHEM installed under /opt/fhem and can start it if apt did not already do that for you.
sudo service fhem start
Setting up some additional modules
In my setup I use the Fritz and SONOS components as well and both require some additional perl modules to be installed. The easiest is to do this via apt (although cpan of course also works just fine)
For the Fritz module:
sudo apt-get install libnet-telnet-perl libjson-perl libsoap-lite-perl
And for the SONOS module you will need:
sudo apt-get install libxml-parser-lite-perl
Installing HMCCU
I own a CCU2 and wanted to continue using it regardless of FHEM, at least for now. There used to be a HMRPC module but that seems to be no longer maintained. Luckily, the HMCCU module is a very good, if not better, replacement. You find it in the contrib _directory of your _FHEM installation and needs to be enabled first by copying or linking it to the FHEM folder.
cd /opt/fhem/FHEM/
sudo ln -s ../contrib/HMCCU/88_HMCCUCHN.pm
sudo ln -s ../contrib/HMCCU/88_HMCCUDEV.pm
sudo ln -s ../contrib/HMCCU/88_HMCCU.pm
sudo ln -s ../contrib/HMCCU/ccurpcd.pl
sudo ln -s ../contrib/HMCCU/RPCQueue.pm
sudo chown -h fhem:dialout *
Mind the chown -h which actually sets the proper user on the links (and not only on the target). Finally, you will also need to make ccurpc.pl executable.
sudo chmod +x /opt/fhem/contrib/HMCCU/ccurpcd.pl
HMCCU also uses a file called hmvalues.txt (path can be changed in fhem.cfg, of course). To be honest, I have yet to figure out how to use it properly, but I’ve put it in its place nonetheless.
cd /opt/fhem/
sudo touch hmvalues.txt
sudo chown fhem:dialout hmvalues.txt
Next, we again need to install some dependencies.
sudo apt-get install librpc-xml-perl
RpiUtils
Since we are running on a Raspberry Pi we might as well install some utilities that allow us to monitor system temperature and other things. Again you find them in _contrib _and need to install them.
cd /opt/fhem/FHEM/
sudo ln -s ../contrib/RaspberryPi/99_RpiUtils.pm
sudo chown -h fhem:dialout 99_RpiUtils.pm
Giving it a go
With everything installed, (re)start the FHEM service.
sudo service fhem restart
Make sure everything is running properly. For me, I need ccurpcd for HMCCU and the SONOS service for my SONOS devices.
sudo ps ax | grep perl
You should see output similar to the following:
pi@spock:/opt/fhem $ sudo ps ax | grep perl
13475 ? S 0:07 perl fhem.pl fhem.cfg
13486 ? S 0:03 /usr/bin/perl ./FHEM/ccurpcd.pl homematic-ccu2 2001 /tmp/ccuqueue_2001 ./log/ccurpcd_2001.log
13495 ? S 0:02 /usr/bin/perl ./FHEM/00_SONOS.pm 4711 3 0
You should be able to browse to your FHEM installation at [http://
Installing Tablet UI
The last step in my installation is setting up the tablet ui basics. They have an excellent wiki which covers the installation process in a lot of detail, so I will be brief. For further details visit the fhemwiki.
In your FHEM web interface, enter the following commands to install Tablet UI and some additional widgets (see also GitHub page of widgets):
update all https://raw.githubusercontent.com/knowthelist/fhem-tablet-ui/master/controls_fhemtabletui.txt

update all https://raw.githubusercontent.com/nesges/Widgets-for-fhem-tablet-ui/master/controls_widgets-for-fhem-tablet-ui.txt
Then we define the URL to the Tablet UI.
define TABLETUI HTTPSRV ftui/ ./www/tablet Tablet-UI
Note that the installation of Tablet UI just comes with an example page. You will have to go into your installation’s www/tablet folder and create an index.html file. Again visit the fhemwiki for further instructions. Once my setup is complete I will also post more details here.
Finally, you can also add the tablet UI to the normal update process of FHEM by running the following command on the web interface:
update add https://raw.githubusercontent.com/knowthelist/fhem-tablet-ui/master
A subsequent update check should also show updates for the Tablet UI now. On the FHEM forum you will also find instructions to create an update button. I have not done that yet, but if you are interested, have a look at the forum topic that describes the details.
Ready, set, go
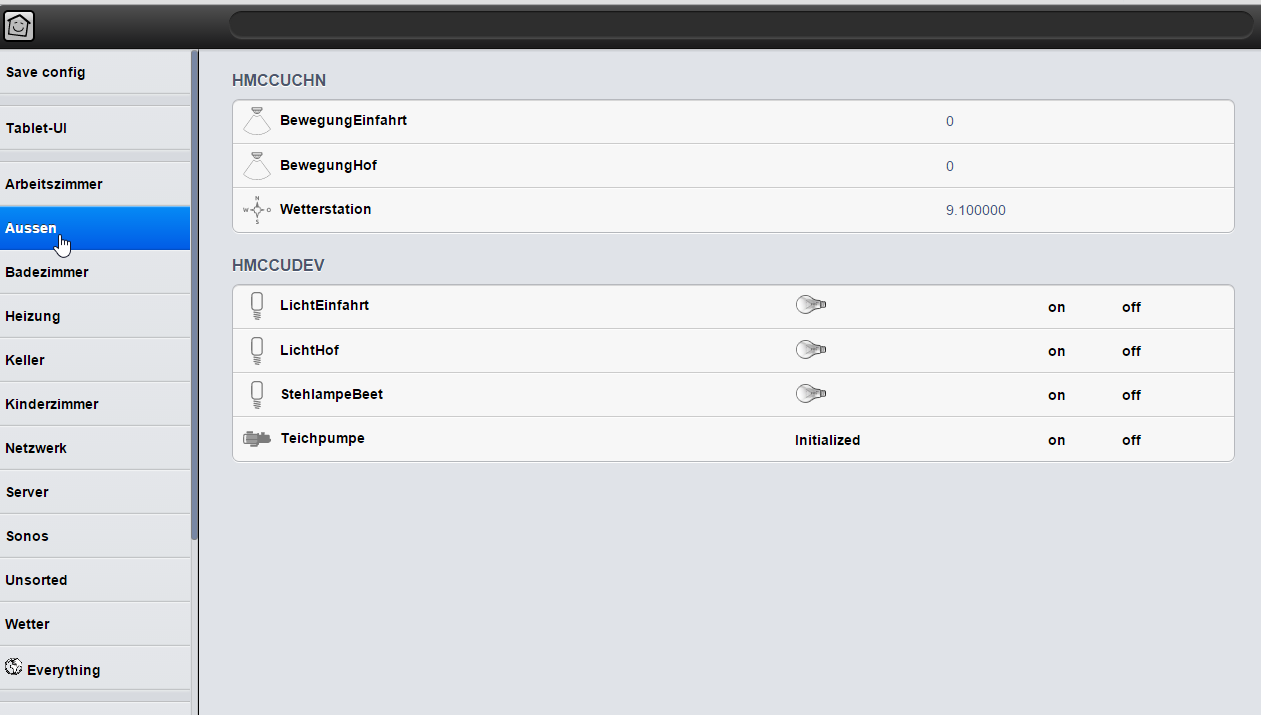
Ok, with all this done, you are basically ready to dive deeper into the configuration of FHEM. I’ll simply close with a picture of my current web UI - the Tablet U has not changed since I last wrote.
I am going to describe further details of my installation and how to set things up, but that is something I will leave for another post.

Leave a comment